[x,y]
array and the value was the value at that coordinate. Then by iterating over all rows
and columns I could check every 3 x 3 area and find the maximum value. This worked but wasn’t particularly fast (I believe the
complexity was O(N³)
).
But then I got to part 2 and I had to check more than just 3 x 3 areas and my implementation was too slow. So I implemented a new
solution using the Matrix
class and the minor
method so get the sub-matrix. You can see this implementation here.
In hindsight this wasn’t much faster then my first version I just guessed that the maximum area would be less than 20 x 20. One
thing I should have done was to track the maximum value for each square size and exit if it ever went down.
After solving it with a Matrix
I wanted to speed up mu implementation so I read some of the tips on reddit which led to
to the wikipedia article for
the summed-area table.
This is exactly what I needed!
A summed-area table is a data structure and algorithm for quickly and efficiently generating the sum of values in a rectangular subset of a grid.
I didn’t find a Ruby implementation so I decided to implement one for myself. First, here’s a visualization of what the summed-area table (SAT) looks like:
4x4 matrix SAT 1 0 6 5 1 1 7 12 4 8 6 7 --> 5 13 25 37 5 3 0 9 10 21 33 54 8 3 4 1 18 32 48 70
The formula for find the sum of the sub-matrix from (1, 1) to (2, 2) is then
sat[2, 2] + sat[0, 0] - sat[2, 0] - sat[0, 2]
which is
33 + 1 - 7 - 10 == 17
.
Since we are starting from the top left in this example, the value for any cell in the SAT is the sum of all the cells above and the left of the cell.
Since I’m working with matrices I opted to extend (monkey-patch) Matrix
with two methods: one for generating the summed-area table, the other to calculate an area.
1 2 3 4 5 6 7 8 9 10 11 12 13 14 15 16 17 18 19 20 21 22 23 24 25 26 27 28 29 30 31 32 33 34 35 |
|
With this new class I was able to optimize my AOC solution and even though I knew that the size of the square in the answer for my input was 16 I still searched every possible size and it still performed faster than my original implementation. The code above for the summed-area calculation is also on github (with some optimizations that shave some time off SAT generation).
Usage example:
1 2 3 4 5 6 7 8 9 10 |
|
Introducing bauditor, a simple gem to help you run bundle-audit on multiple repositories in one pass. It will take a config file with a list of git repositories or you can pass them in on the command line:
1 2 3 4 5 6 7 8 9 |
|
It will clone each repo into a tempdir and then run bundle-audit
. It prints a handy summary at the end. It cleans up after each run so it’s not super fast yet. One of the features I want to add is the ability to persist the repositories as well as specify the repository path.
Check it out on rubygems: bauditor 0.2.2. Or get the source on GitHub.
]]>What is envdir
?
https://cr.yp.to/daemontools/envdir.html
envdir
runs another program with environment modified according to files in a specified directory.
Why not use dotenv
?
dotenv
isn’t meant for production and envdir
integrates nicely with runit
. And if that’s how your
SRE team wants to manage apps then that’s what you use.
So how can I fix it?
Add to the rake command prefix in SSHKit.
Create a new Capistrano task
1 2 3 4 5 6 7 8 9 |
|
This will create a new Capistrano task: envdir:prefix_rake
. By using unshift
we ensure that if the prefix has already been set (for example by capistrano/bundler
)
that we don’t overwrite what is already there.
Wire it up.
Load the rake task
1 2 3 |
|
Inject the new task
1 2 3 |
|
Capistrano will now run rake tasks prefixed. For example,
here is how the asset precompilation task will run (assumes capistrano/bundler
has been required as part of capitrano/rails
)
1
|
|
1 / \ 2 3 / \ 4 5
We will define two classes: Tree and Node. A Node object is a very simple:
1 2 3 4 5 6 7 8 9 10 11 12 13 |
|
We have accessors for the id which will be a unique identifier and will give us the ability to easily retrieve nodes from the tree. The name is just an arbitrary string. Parent is just another Node object. Children is an array of Node objects that all have the current node as a parent. The nodes above would could be modeled as:
1 2 3 4 5 6 7 |
|
Adding children like this is tedious and we also don’t have good way to traverse the tree. So let’s introduce a tree class.
1 2 3 4 5 6 7 8 9 10 11 12 13 14 15 16 17 18 19 20 21 22 23 24 25 26 27 28 29 30 |
|
This class gives us a single accessor for nodes which is just a hash of Node objects. We can retrieve
a node via a method or with hash-like syntax. The add_node
method will add a node to the tree and it will also
update the children on a parent node. Now we can do fun stuff like this:
1 2 3 4 5 6 7 |
|
Now lets add some functionality to traverse the tree to get ancestors as well as the path of a node. These methods are part of the Tree class.
1 2 3 4 5 6 7 8 9 10 11 12 13 14 15 16 17 18 |
|
Ancestors will return an array of node objects ordered from the top of the graph down to the parent of the given node. The path method uses the ancestor array to generate a human readable path to the node. Given the same tree above:
1 2 |
|
The path method could be used, for example, to generate URL paths from an XML taxonomy tree or other data structure.
]]>It’s quite easy to get Passenger running on Heroku: https://github.com/phusion/passenger-ruby-heroku-demo
replace the app server in your Gemfile (unicorn, thin, puma, etc) with
gem 'passenger'
Update your Procfile
web: bundle exec passenger start -p $PORT --max-pool-size 3
This works great but doesn’t come with an obvious was to edit the nginx.conf to add rewrite rules or an include directive. According to the advanced configuration section of the Passenger standalone manual, we see that there is an option to pass a configuration template.
After adding Passenger to your Gemfile and running a bundle install
tun this from you application root directory
to create a configuration template.
cp $(passenger-config about resourcesdir)/templates/standalone/config.erb config/nginx.conf.erb
You could just add rewrites to this file but because the default configuration template may change from time to time
I would recommend adding any custom configuration to another file. Just after the server {
line add
include '<%= app[:root] %>/config/nginx_custom_config.conf';
Create this file in the config directory of your app and add all of your rewrite rules and custom directives to this file.
If you are using this to perform rewrites and you are running on Heroku, this needs to be included
<% if app[:environment] != 'development' %>
port_in_redirect off;
<% end %>
Because Nginx is listening on the random port assigned by the Heroku routing layer Nginx will, by default, include this port number in the rewrite rules that do HTTP redirects. The conditional makes sure that when running on localhost:5000 redirects still work as intended in your development environment.
Other use cases include enforcing SSL on your app, adding HTTP basic auth to an app, and easier generation of CORS headers. So far I’m loving Phusion Passenger standalone on Heroku. In a future post I plan to examine the performance and memory usage versus the existing Unicorn setup.
]]>Here is how one might scale workers using resque hooks and the Heroku platform-api gem. This example scales up a worker for every three pending jobs. It will scale down once the queue is empty and all the workers are finished. It will also scale down when the number of idling dynos is greater than 5. Because it is not possible to control which dynos are killed off, this assumes that your resque workers are handling TERM signals (and hopefully the jobs are idempotent). It is likely that the downscale could kill off working dynos so the jobs so be sure to handle the Resque::TermException for jobs.
1 2 3 4 5 6 7 8 9 10 11 12 13 14 15 16 17 18 19 20 21 22 23 24 25 26 27 28 29 30 31 32 33 34 35 36 37 38 39 40 41 |
|
I installed some tools locally to help track down where and why it was spending
so much time each request. The gem rack-mini-profiler got me started and it is
a great way to get data on each and every request.
This helped me track down some code that was dynamically creating store_accessors
for every request. There is an easy way to check if a
given stored_attribute
exists on a class:
1
|
|
Implementing this check and only adding the store_accessors when needed provided a small performance increase but each request was still spending way too much time in ruby. I spent some time trying to get usable data from flamegraphs and also experimented with adding ‘step’ blocks in my code to help track down where things were slow. The problem I found with rack-mini-profiler was that the rails stack is so deep it makes it very hard to see exacty where the problems are. I still have it installed on a local branch that and I find it very useful in some cases. But for this issue, it left me digging through a convoluted flame graph and I decided to move on.
It was at this point I took a few weeks off from profiling and also took a vacation. Several weeks later I was preparing for a bug day and was getting error traces from New Relic to add to Trello that I revisited the performance issues. We are on Heroku so I decided to switch our free New Relic plan to the plan the provides the paid-level features for a limited number of dynos. What this gave me was access to my new favorite profiling tool: the New Relic thread profiler. I ran the tool for a 5 minute trace and this was the result:
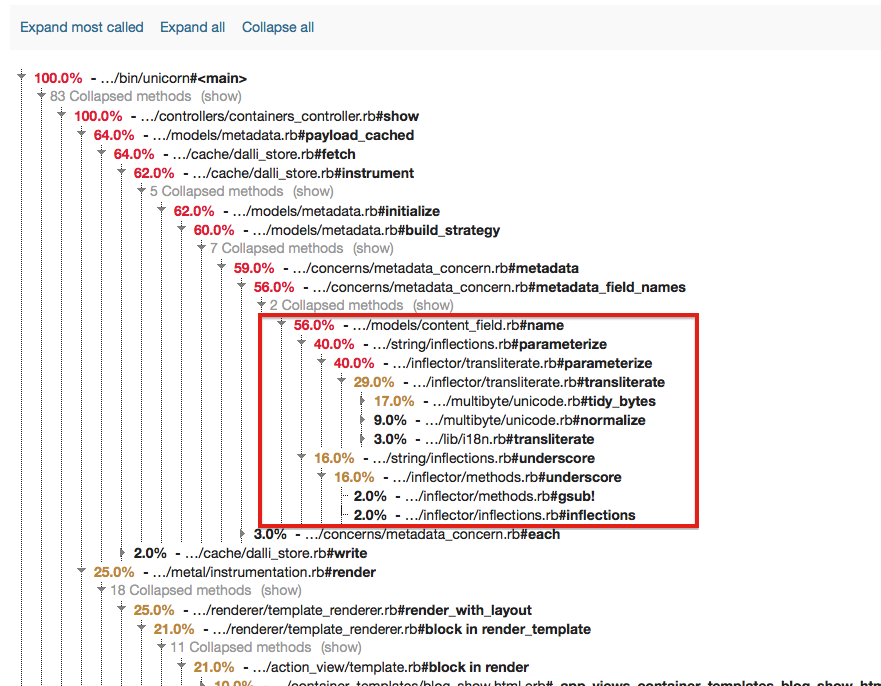
I had to uncollapse a few parts of the tree but it’s pretty clear that the request was spending over 56% of the time in the name method on the ContentField model. Which, as it turns out, was a method that was no longer even needed. The offending, extraneous code:
1 2 3 4 |
|
I think this was added in the initial phases of building our CMS to ensure conformity with seeded names alongside imported field names from Drupal. The drupal importer I wrote handled all the transformations and there are validations so enure that field names are created properly. This method does nothing at all except run downcase, parameterize, and underscore on strings that already conform to that format. And, as it turns out, inflectors don’t come cheap. I removed the method, ran my tests, and deployed a new version of the CMS. The performance increase was noticable immediately:
It’s not everyday that removing 4 lines of code (well, it was really just one) can give you such a boost in performance. Lessons learned:
Helpful links:
]]>If you are using Rails 4.x on Heroku and you have your schema format set to sql (which you probably should), you will see this error when running heroku run rake db:migrate
1 2 3 4 |
|
This is an interesting bug that, as it turns out, can be ignored.
ActiveRecord will only run the task db:structure:dump
if you are using ‘sql’ as
your active_record.schema_format
. And that rake task (db:structure:dump
) will
fail on Heroku because the executable pg_dump
is (unsurprisingly) not in the
binary path. Interestingly enough, Heroku states that db:schema:dump
is not
supported but if you set the schema format to ruby, it works fine. Of course,
you would end up with a schema.rb
file on one-off dyno that will not exist
shortly after the rake task finished running.
In Rails 3, the dump task would only raise an error is the exit code of the
command was 1. On unix based systems if a command is not found, the exit code
is 127. So even if the pg_dump
command fails on Rails 3 (which it does), it
won’t raise an error and it won’t halt the rake task. So anyone using a sql
schema format with Rails 3 wouldn’t have this issue because it would fail
silently. The code was refactored in Rails 4 to properly raise an error if the dump failed.
This means that db:migrate
will raise an error on Heroku.
However, even though it errors with rake aborted the DDL from the migration is actually executed and committed.
Here are some possible solutions (if the error really bothers you):
1
|
|
1 2 3 |
|
I was testing out Octopress and decided it was time to finally start a blog. No, this won’t be the realization of my imaginary blog about the art of the movie trailer. This will be about my experiences with Ruby, Rails, PostgreSQL, Redis, etc. I hope that by documenting what I have learned that I can help others along they way. Plus, as I age and my memory fails me I can just google for my old posts.
]]>